Showing posts with label single serving. Show all posts

Friday, June 14, 2013

Popovers for One (in a muffin tin!)

Sometimes it's easy to feel sorry for myself when all my friends are off travelling and hanging out together. But you know what? I'm going to take the positive side of things for once.

Alone time means baking time.


It's so much more enjoyable to throw something into the oven rather than throw a pity party. I suppose you could do both, but I find that carbs don't weigh on my conscience so much when I'm smiling.

I was perusing through food blogs yesterday when I stumbled across popovers, and thought, wow- those look amazing!


I read somewhere that the popover is the show-off cousin to the Yorkshire pudding, and found the epithet quite pleasingly accurate. On one side, the British one being self-deprecatory and typically a side note to a meaty Sunday roast, while the American popover steals the show. Both have their merits.


(But secretly I admire the chutzpah of the popover.)

So many of the recipes that I subsequently googled were meant to yield a dozen or even two dozen popovers, or required a popover pan. I suppose this is a good thing if you're preparing for a large picnic or dinner party, but I ain't got time fo' that! I wanted popovers just for myself.


But even I have my limits. I don't think I can eat 12 popovers without feeling like a lump of dough myself.

So here is my version of this popovers recipe, adapted to serve one person! This means: 3 popovers in regular-sized muffin tins. Plus, the recipe requires pretty basic ingredients, and you don't need any yeast for these fun bread roll-like popovers! It's like magic!


INGREDIENTS
- ⅓ cup milk
- ⅓ cup AP flour
- pinch of salt
- 1 large egg
- just under ½ Tbsp vegetable oil *
- ½ Tbsp butter, melted (or cooking spray) **
- (optional) shredded cheddar or Colby Jack cheese

*You can substitute ½ Tbsp melted butter, but I used up the butter for greasing the muffin tins and was so repulsed by the smell (my mom too-successfully weaned me off of butters and fats) that I decided to go with oil instead.
** Optional: see comments below.
Preheat your oven to 450°F. It will take awhile for it to heat up, so do this before anything else. When you've done this, generously grease 3 muffin tin cups with melted butter or cooking spray. You can even forgo this step if you want, but the popovers will stick to the tins - I tried one without buttering the tin, and it actually didn't stick too badly; it only needed a little coaxing with a knife, but if you're going for perfection, better to oil up!) Note: it only took 30 seconds for my ½ Tbsp butter to melt in the microwave, so start out with a small increment of time.


In a medium-sized bowl, mix together the milk, flour, and salt. Don't worry if it's a bit lumpy! Batters come in all shapes and sizes, and still taste good :D


Add the egg, and stir well to make sure the egg is incorporated well into the rest of the mixture. (Alternately, you could beat the egg before adding it in, but I was too lazy.) I cracked the egg into the bowl with which I had melted the butter, so as to pick up any remaining butter.


Then add the oil, and mix. The mixture will be quite runny.


If you'd like to add some shredded or grated cheese, please do! I only added a little bit because I was wary of altering the recipe too much, but I'd say that a good handful of cheese would work. You could also try some ground black pepper, or chopped chives, or whatever else happens to inspire you at the moment!


Hopefully your oven will be preheated to 450°F by now, but if it isn't, it should soon be ready. (Meanwhile, I watched one of my favorite movies...)

The Breakfast Club
When your oven is ready, heat the prepared muffin pan in the hot oven for 1 to 1½ minutes. This is what allows you to use a muffin tin instead of popover tins, which capture heat more readily than the standard muffin pan. If you're too impatient to wait for the oven to heat up completely or if it's taking an extraordinarily long time and you don't want the butter/oil to evaporate, slide the tin in but keep a close eye (and nose) on it.

(The butter is apparently supposed to sizzle, but I think a little bit of egg mixture got into the tins and instead it was starting to burn, setting off the smoke detector. Oops! I quickly removed the tin from the oven and fished out the offending piece of blackened egg.  Crisis averted! This should not cause any problems for you if you don't spill egg into the butter/cooking spray.)

Take out your muffin pan carefully from the oven, and spoon your batter into the three muffin wells/cups. They should each be about ¾ full. (You may want to put a paper towel under the tin while you're transferring the mixture, because it can get kinda messy if you get distracted like I did.)


Bake the popovers at 450°F for 15 minutes without opening the oven. (Resist the temptation! If you open the oven door, the popovers will deflate, and will no longer be 'popovers.' If you must take a peek, turn on the oven light if you have one.)


Then lower the temperature to 350°F and bake for 15 minutes more. If you're making larger-sized popovers, you may need to let them cook for 5 minutes more.

Turn the oven off, and take your muffin tin out using oven mitts. Carefully remove the popovers from the tins, and check that the bottoms have browned. The ones that I buttered already popped out on their own, while I needed to apply a butterknife to the sides of the unbuttered popover.


Use a toothpick or thin chopstick to poke a hole in the top of each popover. This will let out a little bit of the steam that worked so well to puff up the popovers. (You can see a little bit of steam from the rightmost popover in the photo!)


There may be some gooey spots left, so let them dry out in the oven for up to 10 minutes. You can either keep them in the muffin tin for this or transfer them to a baking sheet.


Eat these while they're still warm!


These go great with jam and also all kinds of leftovers. I had them with a bit of shredded chicken and enoki mushrooms with peanut sauce that my mom made last night. The little air pockets in the popovers are good for loading the chicken into! (Ooh, these would probably be amazing with chicken salad or sauteed mushrooms.) They're also tasty enough on their own! Oh- and they are perfect for breakfast, brunch, lunch, dinner, or even a snack!


Popovers are definitely something that I want to try again. I'm even smiling just looking at these photos. :) Hope you like them too!

Wednesday, June 12, 2013

Microwaveable Mac & Cheese

I've been debating whether or not to post this recipe. It's not like any of my other 'recipes' are fancy or anything, but I feel like I've kind of let myself down.

Yes. Microwave mac and cheese.


Actually not bad! I still prefer ramen as an easy fix, but I had a little extra cheese to use up, so cheesy pasta it was. (I am the epitome of a college student, it would seem.)

I did make a mess of the microwave while trying to make this in a mug, so don't do that. Unless you actually like sopping up starchy water with a pile of soggy napkins. (I make that sound so appealing, don't I?) The original person who concocted this college-student-friendly dish did warn me in her post. But what did I do? I went, psh! I can handle it! Mug it is!


No. Really, no. One does not battle the microwave gods, armed only with a tiny coffee mug, and win. You see that water in the mug? Ended up all over the microwave plate.

A bowl is good. It's not like I have any dignity to protect at this point, so messing up the mug part the "Instant Mug o' Mac & Cheese in the Microwave" recipe doesn't even put a dent in my armor.

INGREDIENTS
- 1/3 cup pasta *
- 1/2 cup water
- 1/4 cup milk
- 1/2 cup shredded cheddar or Colby Jack cheese

* I used slightly more because farfalle doesn't fit neatly into measuring cups, and it was the only type of pasta I had.
Combine the pasta and water in a medium- to large-sized microwaveable bowl. (The larger the bowl or mug, if you insist, the less likely the water will be to overflow.) Microwave on high for two minutes, then stir. (When taking your bowl/pasta receptacle out of the oven, use paper towels or oven mitts to hold the sides, as the bowl will be extremely hot!)


Repeat this for at least 2 to 4 more minutes. I had to transfer mine from the cup to bowl, and I added a little too much water on the transfer, so I had to microwave the pasta and water mixture for a total of 8 minutes, I believe.


How to know when to stop microwaving: the water will be absorbed by the pasta, and the pasta will be cooked through. (Mine was on the al dente side, but good enough for me.) If the pasta is still too dry, add a tablespoon of water and cook another couple of minutes, depending on your microwave.


Remove from microwave and stir in the milk and cheese. Microwave for another minute or two. (Non-fat milk is more watery, so I had to microwave the pasta for another 4 minutes.)


Stir the cheese into the pasta, and eat! (Don't let it cool for too long, or you will be left with a cheesy mess that has seized up at the bottom and sides of the bowl! Also, why would you wait to eat it?)


I should be more ashamed, but I'm not. I ended up also making another sausage and apple quesadilla because they are so good. Cheesy overload for one, coming right up!


Still not ashamed.

Wednesday, May 29, 2013

Sausage & Apple Quesadilla

My family isn't a huge fan of sweets. Don't get me wrong: an occasional sugar bomb isn't out of the question for me. (And cupcakes. Uf. Can't resist!) But we generally prefer savory foods, and when I'm baking, I tend to alter the recipe by taking out some of the suggested sugar amount.

So my mom tends to stick with the savory food when she's cooking, and I predict that I'll do much of the same... unless the sweet is mixed with savory. I'm talking about there being a bowl of grapes set aside on one side of the counter, and a bowl of short ribs on the other. I will gladly alternate between the two.

One combination that has always piqued my interest is sausage and apple. I'm not even sure that I've had those two together before today, but in any case, I decided to cook up a sausage and apple quesadilla for brunch just to see if it was as good as I had hoped it would be.


¡Que sabrosa! So tasty.

Admittedly, it is rather unwieldy for a quesadilla... requiring knife and fork (or in my case, a knife, chopsticks, and hands). But hey, I was hungry!


So here you have it, a big tasty quesadilla that's easy enough for noobs like me.

INGREDIENTS
1/4 to 1/2 apple *
spicy Italian sausage **
shredded cheese ***
1 flour (or corn) tortilla

* I used a Gala apple
** I used about a 1:1 ratio of sausage to apple, but it shouldn't matter as long as it tastes good to you!
*** I used Colby Jack

The sausage isn't pictured above in the ingredients photo because alas! it was already cooking on the stove before I remembered that I needed my camera!


Take the sausage out of its casing, breaking it down into smaller pieces, and brown it in a nonstick pan on low to medium heat. The oil from the sausage should be enough, especially with the spicy sausage I was using. (Though I'm sure a little olive oil won't hurt if you want to use some!)

Meanwhile, with the sausage happily cooking away, peel and cut your apple. I'm really not so good at peeling apples yet. (Still afraid of the knife!)


When all the sausage pieces look slightly browned, add in your apples. I wanted mine to be somewhere in between crunchy and soft, so I let them cook with the sausage for a couple of minutes, stirring to make sure none of the sausage was still pink.


When the sausage and apple mixture is cooked sufficiently to your taste, empty it out into a bowl and set aside.


Lay your tortilla in the pan and sprinkle some cheese on it. (There was enough leftover oil from the sausages that I didn't need to add any extra olive oil, but use your judgement!)


When the cheese starts to look a little melted, add in your sausage and apples.


Add some more cheese on top, which will help the quesadilla stick together when you fold the tortilla in half. (I probably should have added more cheese.)


Fold the tortilla in half. I had a little too much filling, so it got a little messy with this step. (Apples overboard!) Alternately, you could distribute the sausage and egg evenly across the whole tortilla, and then lay another tortilla on top. I only wanted one tortilla though, so I got a very corpulent quesadilla.


Slice it up into manageably-sized pieces, and it's time to chow down! (Did I really just type 'chow down?' I don't even know myself right now.)


How do you like dem apples? (Sorry. Sorry, I couldn't resist!)

(Afterwards, I cooked up the rest of the three sausages and half an apple and stored them in the fridge for even quicker quesadillas next time!)


Do you happen to like any food combinations that initially sound strange? (My mom thought the sausage and apple might not turn out tasty, but aha! I liked it!)

Anyways, hope you enjoy your quesadilla if you decide to try this out!

Thursday, May 23, 2013

Banana Chocolate Chip Mug Cake

As promised, I come bearing another mug cake recipe!


This one was not quite as successful as the first, but still tasty enough to post, in my humble (grumbly tumbly) opinion.


Alright, so it wasn't enough to sustain me through the day, because having eaten it at 10:30am, my stomach was grumbling by 3:00 in the afternoon. Not a snack that can be used to substitute for two meals.

So I had a little snack when I got home.


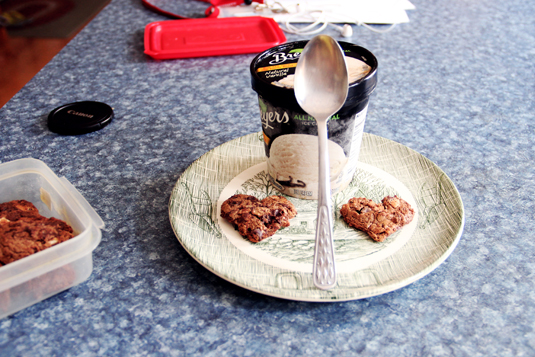
(The flourless double chocolate cookies came out looking very deflated, and they ended up being too sweet, so I will try to modify the recipe and see if I can perfect it for a future post.)


Anyway, I digress... back to breakfast! When I woke up and ambled into the kitchen groggily, I noticed this rabbit snoozing in the grass outside.


Living the life! Can you smell the mug cake coming into fruition?


Yes, yes, I digress again. On with the recipe, as I'm watching a replay of the Real Madrid/Borussia Dortmund semifinal match at the moment. Hopefully I can finish typing this up before halftime is over!

This recipe is adapted from Kirbie's Cravings.

INGREDIENTS
4 Tbsp AP flour
2 Tbsp sugar
1/2 tsp baking powder
1/8 tsp cinnamon
2 Tbsp mashed banana *
3 1/2 Tbsp (fat free) milk
1 Tbsp chocolate chips **

* approx. 1/2 of a banana
** original recipe calls for mini cinnamon chips

Mix together dry ingredients (flour, sugar, baking powder, cinnamon). If you want more of a cinnamon taste, either add 1/8 tsp more cinnamon (making it a total of 1/4 tsp cinnamon) or add fewer (or none at all) chocolate chips later on.


Mash 1/2 a banana; the riper the banana, the better. The banana I used wasn't very ripe, so it was slightly harder to smush.


Add the banana to your dry ingredients, and mix. It'll be clumpy, and you don't have to mix it perfectly because it will be easier to mix once you add the milk in.


Add milk in and stir. Make sure the dry ingredients don't clump at the bottom and sides of the mug.


Now you can add in some chocolate chips, and stir. Leave a few to sprinkle on the top. (I forgot to take a picture for this step.)

Microwave for between 1:15 to 2:00 minutes. Mine came out a bit soggy still when I microwaved it for only 1:15, but you'll want to adjust accordingly for your own microwave.


(I had already dumped out the cake onto a plate when I realized it hadn't cooked fully, so it looks a bit messy because I had to transfer it back into the mug to re-microwave.)


Let the mug cake cool for 20-30 minutes inside the mug. In the meantime, you can slice the other half of the banana to decorate. (Or you can just eat it.)


Use a knife to loosen the sides, and transfer the cake to a plate if you'd like.


Eat! (Always. Eating is good.)


Oh, and one more picture of my cookies, now with a serving of ice cream and "I Need My Girl" by The National, before I leave.


Goodbye, Mr./Ms. Bunny!